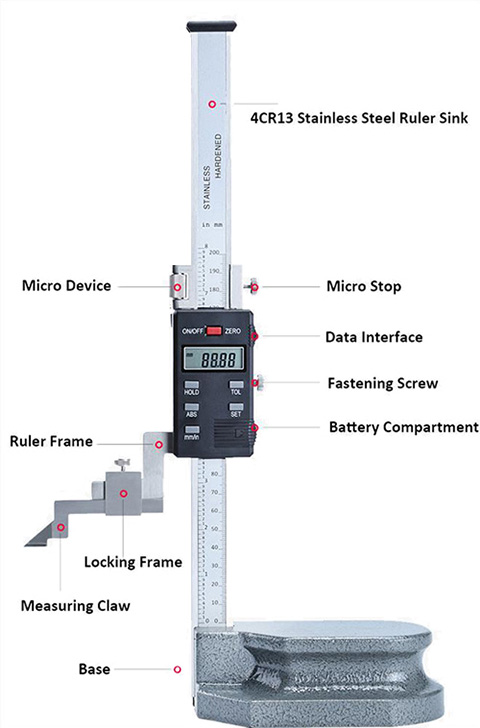
Introducing our 0-600mm digital height gauge, a precision measuring tool that can measure heights, depths, and distances up to 600mm with high accuracy. Perfect for use in manufacturing industries, inspection and testing laboratories, and engineering and design applications. Its smooth sliding mechanism and easy-to-read display make it simple to use, while its high accuracy of up to 0.01mm ensures precise measurements every time.
Specification
| Model |
T-DHG-600 |
| Measurement Range |
0-600mm |
| Resolution |
0.01mm |
| Voltage |
1.5V |
| Error Value |
±0.07mm |
| Responding Speed |
1m/s |
| Body Material |
4CR13 stainless steel |
| Battery Type |
1.5 button battery |
Features
A 0-600mm digital height gauge is a precision measuring tool that is designed to measure heights, depths, and distances up to 600mm with high accuracy. Here are some features of a 0-600mm digital height gauge:
- Measuring range: The main feature of a 0-600mm digital height gauge is its large measuring range, which allows it to measure heights, depths, and distances up to 600mm.
- Digital readout: The gauge features a digital readout that displays the measurement result in metric units. This readout can be zeroed at any position, allowing the user to take incremental measurements.
- Accuracy: A 0-600mm digital height gauge has a high accuracy level of up to 0.01mm, making it suitable for precision measuring tasks.
- Easy to use: The height gauge has a smooth sliding mechanism that allows the user to move the gauge up and down with minimal effort. The digital readout also makes it easy to read and record the measurement result.
- Versatility: A 0-600mm digital height gauge can be used for a wide range of measuring tasks. It can measure the height of components, the depth of holes, and the distance between two points with high accuracy.
- Data output: Some models of 0-600mm digital height gauges come with a data output feature that allows the user to transfer the measurement data to a computer or other device. This can be useful for quality control and documentation purposes.
- Built-in spirit level: Some 0-600mm digital height gauges have a built-in spirit level to help ensure accurate measurements.
Digital Height Gauge Structure Diagram

Tips: Digital height gauge troubleshooting
When the digital height gauge is used correctly, the failure rate is generally low. However, problems may arise due to improper use or low battery voltage, and occasionally the following faults may occur:
1. "Crash"
Due to accidental strong interference from the outside world, the display value is locked and not moving. Treatment method: Remove the battery, and reinstall it after 30 seconds (sometimes repeat once or twice) to return to normal.
2. Display flickering
The battery voltage is too low, and a new battery should be replaced (to prevent battery short-circuiting).
3. Digital confusion
There are three main reasons:
- The surface of the protective film is damp or stained with cutting fluid (or other conductive particles). Treatment method: use a dry and clean cloth slightly moistened with absolute ethanol or aviation gasoline, and wipe off the surface of the ruler and the protective film. Sometimes it is necessary to wipe the surface of the ruler body with a clean soft cloth dampened with a little pure water, and then dry it with a clean soft cloth or let it dry naturally.
- The surface of the copper-clad laminate grid strips under the protective film is blackened due to corrosion and oxidation, which affects signal transmission. Treatment method: Polish the surface of the copper skin of the grid bar with a rubber tip containing fine sand (be careful not to use too much force, so as not to scratch the surface of the copper skin and scrap it), and then apply a very thin layer of 502 glue to paste the protective film.
- Damaged electronic components——handling method: replace the components.
4. Wear of measuring surface
The repair method for the wear of the external measuring surface is basically the same as that for a regular vernier caliper, but attention must be paid to prevent damage and contamination of the protective film surface and the digital display component from being impacted.
The problem encountered during the repair of the internal measuring surface is that the root of the internal jaws is hard and brittle, making it easy to break and causing difficulty in repairing. The solution is to locally heat the root of the internal jaws (away from the measuring surface, and the heating temperature should not exceed 200℃ to prevent the measuring surface from annealing), and then adjust the jaws.
If the "wear" (gap) of the internal and external measuring surfaces is relatively large, it is generally due to serious wear of the slot base surface of the ruler frame, and the front-end slot base surface of the ruler frame should be repaired (filed and polished).
5. Wear on the side of the ruler body
The lower side of the ruler's body is the base surface, and its straightness has an important influence on the accuracy of the whole ruler. Use a grinding plate to grind finely to make the straightness within 0.01mm (check with a flat ruler or a knife-edged ruler). The parallelism between the upper side of the ruler and the base surface (checked with a micrometer) should be controlled within 0.01mm.
6. Cleaning and adjustment
Keeping the measuring instrument clean and having it regularly adjusted by a professional is necessary to maintain accuracy and prolong the service life.

